


Select from a wide range of textures, colours, and patterns using the Starlight Drapery catalogue which contains 4" by 8" fabric swatches, updated seasonally.
Prices include poly-cotton lining, blackout lining, or ultrasoft
blackout lining with the exception of unlined sheer fabrics.
Refer to pricelist to determine the standard lining of each individual fabric collection. Blackout lining is available as an upgrade for all collections lined with poly cotton.
Select from one of six headers.

Top Tack | ITEM 201
Hooks or Tabs
French Pleat | ITEM 204
Hooks or Tabs
Euro Tack | ITEM 202
Hooks or Tabs
Reverse Pleat | ITEM 203
Hooks or Tabs
Ripplefold | ITEM 208
Requires Starlight
Ripplefold Rod or Track
Grommet |
ITEM 205 • Brushed Nickel
ITEM 206 • Satin Gold
ITEM 207 • Oil Rubbed Bronze
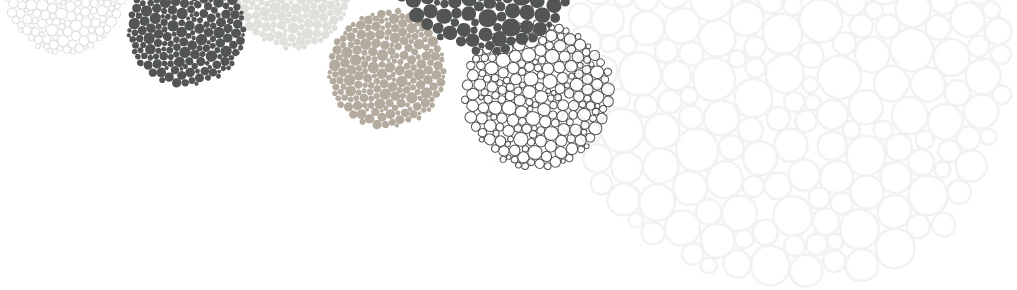
Both hooks or tabs can be used to hang drapery panels with Top Tack, Euro Tack, Reverse Pleat and French Pleat headers. Tabs allow you to hang drapery directly on a drapery rod without any additional hardware. Hooks allow you to hang drapery on rings or gliders and allow for better mobility. Hooks will be placed 0.5" from the top of the header.

Standard Rod | TABS
Tabs are sewn behind each pleat so that the drapery panel can be hung directly on the rod. This option limits mobility and is ideal for panels that are intended to remain stationary.
Standard Rod with Rings | HOOKS
Hooks are placed behind each pleat so that the drapery panel can be hung on rings. This leaves the rod exposed.
Channel Rod with Gliders | HOOKS
Hooks are placed behind each pleat so that drapery panels can be hung on gliders that move through a channel rod. Rod can be left exposed or hidden by adjusting the position of the hooks.
Channel Track with Gliders | HOOKS
Hooks are placed behind each pleat so that the drapery panel can be hung on gliders that move through a channel track. Brackets are placed above the track and will not interfere with the movement of drapery.
Completely customizable. Pricing is provided for each fabric collection in a width by length chart format for up to 104" wide and 130" long. If greater length or width is required, please call for a quote.
Customize further by detailing drapery panels with decorative trim. Refer to the Decorative Trim catalogue for samples and item numbers.

Determine the height of your drapery rod. Do you want your drapery to go to the ceiling,
just above the window frame, or somewhere in between? This will determine the length
of your drapery.
Determine the width of your drapery rod. Keep in mind that when the drapery panel is open,
or “stacked”, the stacked fabric will take up space. When the drapery is stacked do you want
it to hang beside the window, or is it acceptable for the drapery to partially cover the window?
Determine the width of your drapery panels. Not all heading styles have
the same fullness. Pleated and ripplefold panels have 2x fullness built into their
width measurements, while grommets and European tacked panels are flat.
One width of fabric will cover 26" of window at 2x fullness.
Determine the finished length of your drapery panels. After choosing
your drapery header, hanging option and hardware, measure accordingly
(no clearance from the floor):
Measure from the top of the drapery rod or track to the floor,
a. Pleated panels with tabs hung on 1 ⅛" standard rod
b. Pleated panels with hooks hung on 1 ⅛" standard rod and rings
c. Pleated panels hung on 1 ⅛" channel rod and gliders
d. Pleated panels hung on channel track and gliders
e. Grommet panels hung on 1 ⅛" standard rod
f. Ripplefold panels hung on 1 ⅛" Ripplefold rod
g. Ripplefold panels hung on Ripplefold track
All measurements pertain to Starlight Drapery panels and hardware.
Add ½"
Deduct 2"
Deduct 1 ¼"
Exact
Add 1 ¼"
Deduct 1 ½"
Deduct ⅝"
Select from a wide range of textures, colour, and patterns using the Starlight Drapery catalogue which contains 4" by 8" fabric swatches updated seasonally.
Prices include Blackout lining. Sheer valances are lined with voile.
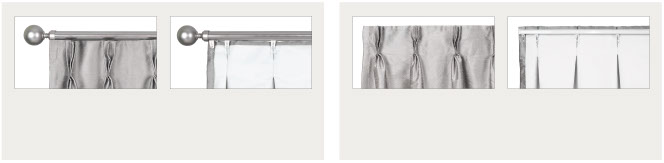
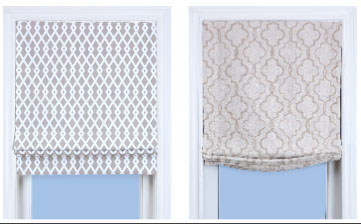
Select from one of four valance styles.
Roman Valance | ITEM 601
Up to 24" long, with four
stationery pleats
Tailored Valance | ITEM 602
Up to 20" long

Completely customizable. Pricing is provided
for each fabric collection for up to 98" wide. If greater width is required, please call for a quote.
Measurements shown on the Valance pricelist reflect the cost of the finished width of all valances. The finished width includes the
face measurement, and left and right return measurements. When ordering, please indicate face, return, and finished measurements.
SAMPLE MEASUREMENT
Face: 19" + Left Return: 3.5" + Right Return: 3.5"
= Finished Width: 26"
Face
Measurement
Return
Measurement
Valances require mounting boards. All mounting boards are covered in lining. Pricing is provided in a chart format for widths up to 96" and returns between 1.5" and 7.5".
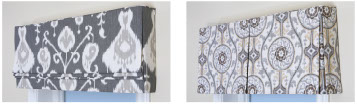
Flat Valance | ITEM 603
Up to 18" long (shown with decorative trim addition)
Relaxed Valance | ITEM 604
Up to 24" long, with four
stationery pleats
Customize further by detailing valances with decorative trim. Trim can be placed on valances in any position, vertically or horizontally. Refer to the Decorative Trim catalogue for samples and item numbers.
When designing an outside mounted valance, it is important to consider what other window treatments are going underneath, if any. Be sure to allow enough width and return to allow any drapery panels, roman shades or hard window coverings to operate properly.

Determine the face measurement of the valance (width). Measure the top of the outside of the window frame and add
a minimum of 2.5", or greater.
Determine the return measurement of the valance.
How much space is required under the valance? The width
of returns depends on what window treatments are going underneath, if any.
Roman Shade – 3.5" return required
Drapery panels – 5.5" return required
Two layers of drapery (side panels and sheers) –
7.5" return required
The face measurement plus the left and right return measurements will give you the finished width. Be sure
to indicate all three measurements when ordering.
Determine the length of the valance. Consider how high
above the window will the valance be placed and how much
of the widow should be covered.
SAMPLE MEASUREMENT
Face: 19" + Left Return: 3.5" + Right Return: 3.5"
= Finished Width: 26"
Face
Measurement
Return
Measurement
Inside mounted valances are commonly used as stationary or “faux” roman shades. When designing an inside mounted valance, make sure the depth of the window frame can accommodate a 2" valance mounting board.
Determine the width of the valance by measuring
the top of the inside of the window frame.
Determine the length of the valance.
How much of the window should be covered?
This guide pertains to Starlight Drapery Valances


Select from a wide range of textures, colours, and patterns using the Starlight Drapery catalogue which contains 4" by 8" fabric swatches, updated seasonally.
Prices include poly-cotton lining. Ultrasoft blackout lining upgrade available (5% surcharge). Sheer roman shades are lined with voile.
Completely customizable. Pricing is provided for each fabric collection in a width by length chart format for up to 98" wide and 84" long. If greater length or width are required, please call for a quote. Roman shades can be inside or outside mounted. Returns are available for outside mounted roman shades.
Customize further by detailing Roman Shades with decorative trim. Trim can be placed on Roman Shades
in any position, vertically or horizontally. Refer to the Decorative Trim catalogue for samples and item numbers.
Flat or Relaxed Romans
Flat Roman Shade
One Stationary Pleat | ITEM 701
Flat Roman Shade
Four Stationary Pleats | ITEM 702
• Does the depth of the window frame have enough space to accommodate the 2" Roman Shade track for an inside mount?
• If the roman shade is inside mounted, will there be enough window exposed when the shade is open or stacked?
• Do you want to leave the window frame exposed (inside mount) or do you want the roman shade to cover the frame (outside mount)?
• Outside mounted roman shades provide better light control and allow more freedom in determining finished length and width.
Determine the width of the Roman Shade.
Measure the width of the inside of the window frame at the top, middle and bottom to ensure the window is symmetrical. If the window is not symmetrical, use the measurement at the narrowest point.
Determine the length of the Roman Shade.
Measure the length of the inside of the window
frame on the left and right sides to ensure symmetry. Again, if the window is not symmetrical, use the measurement at the shortest point.
Determine whether you would like the Roman Shade control on the left or right
of the window.
This guide pertains to Starlight Drapery Roman Shades
Determine the width of the Roman Shade.
a. Measure the width of the outside of the window frame
at the top, middle and bottom to ensure the window is symmetrical. If the window is not symmetrical, use the measurement at the widest point.
b. Add a minimum of ½ inch to this measurement to ensure the Roman Shade covers the width of the window frame, or greater.
Determine the length of the Roman Shade.
a. Measure the length of the outside of the window frame on the left and right sides to ensure symmetry. Again, if the window is not symmetrical, use the measurement at the longest point.
b. Add a minimum of 2" to accommodate the roman shade track and an additional 1" to ensure the roman covers the length of the window frame, or greater.
Determine whether you would like the Roman Shade
control on the left or right of the window.
Select from a wide range of textures, colours, and patterns using the Starlight Drapery catalogue which contains 4" by 8" fabric swatches, updated seasonally.
Knife Edge or Self-piped. Prices include feather filled
inserts and zippers.
Multiple cushion sizes are available. Pricing has been provided
for cushions from 18" by 18", to 26" by 26". Pricing for kidney cushions is based on square measurement (ie: the price of a 20" by 14" kidney cushion would reflect the price of a square 20" by 20" cushion).
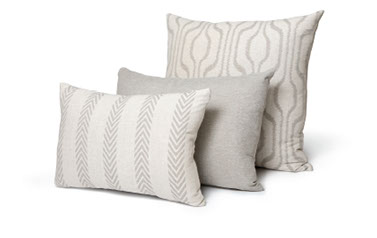
Customize further by detailing cushions with decorative trim. Trim can be placed on cushions in any position, vertically or horizontally. Refer to the Decorative Trim catalogue for samples and item numbers.
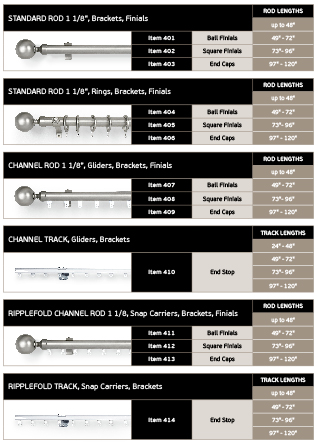
The drapery hardware program works in conjunction with the drapery panel program. On the order form specify what hardware package and finish you require on the same line as the drapery it’s intended for. Your drapery rod or track will be cut to specified measurement if requested and the necessary rings, gliders, carriers finials and brackets will be included. Centre support brackets are included for rods over 6ft. Drapery panels must draw from centre when using rods over 6ft. Ceiling mount brackets are also available.
Choose from three classic
finials that accommodate
all 1 ⅛" drapery rods.
All drapery hardware
programs that include rods,
finials and brackets are
available in three finishes.
Pricing is provided for lengths up to 120". If greater lengths are required, please call for a quote. Rod or track can be cut to your specification. Centre support brackets are included for rods over 6ft. Joiners are included for rods over 8ft.
| BALL FINIAL

| SQUARE FINIAL
| END CAP
| Brushed Nickel
| Satin Gold
| Oil Rubbed Bronze
Click image for large view


Ivory Blackout
3 pass black out lining
with soft suede thermal
coating.
Contents:
65% Polyester, 35% Cotton
Ivory Ultra Soft Blackout
Ultra soft anti-static & crease
resistant, thermal finish.
Used in all silk panels.
Contents:
100% Polyester
Designer’s Centre & Drapery Workroom | 220 Royal Crest Court, Unit 5, Markham, ON L3R 9Y2
T 905.479.5545 F 905.479.4079 E info@starlightdrapery.com
Copyright © 2015 Starlight Drapery • Creative & Website Design by Slant Creative Group